Showing posts with label desserts. Show all posts

Monday, April 18, 2011

Easter Cookies

We love decorating cookies around here. Although Christmas is the traditional time to do it, we always seem to be inundated with other baking projects around that time of year. So we find other times to decorate cookies. Usually Halloween cookies squeeze their way in. It's been a while since we've made Easter cookies. I forgot how colorful and beautiful they are! This was the first time we've made butterfly cookies. I thought they would be fun to decorate, but when it came time to do it, I didn't know where to begin. We both tried to do symmetrical designs. I usually went the way of drawing a silly smily face. Maybe next year we'll do fewer butterflies and more of my personal favorite...eggs!

And here's the whole lot!

Saturday, January 8, 2011

Monkey Birthday Cake

Our youngest nephew celebrated his first birthday while we were all together for Christmas. So of course I volunteered to make his birthday cake. When I thought about it, I had never made a kid's birthday cake before. But it was not that hard to think of a design. At first I thought Star Wars, but then I chickened out. (It would have need excellent execution plus a black cake does not really scream one-year-old.) Then I thought about animals and almost immediately came up with a monkey. Monkeys are funny. They have big ears, a big smile, and not a whole lot of detail.

Here's the sketch I came up with.

Brett and I baked the cakes including two cupcakes for ears. The next day, I mixed up the frosting and got to work.

I used the regular star tip for everything except for the whites of his eyes. It took a lot of patience and I had to rest my hand every once in a while.

I think it turned out pretty darn cute, if I do say so myself. And the birthday boy seemed to like it.

Sunday, January 2, 2011

Peppermint Bark Cookie Bars

Happy New Year! If you are anything like me, you've had more than your fair share of sweets lately. I've certainly overdone it on candy and cookies. But if you haven't had enough, or if you're not sure what to do with a few leftover candy canes, this is a tasty and easy dessert to try.

I found this recipe from the Cookin' Canuck linked on the Pioneer Woman's website. I love peppermint bark and I love cookies, so this seemed like a perfect recipe to try.

I mixed up the dough (2 sticks butter, 1 cup sugar, 1 tsp vanilla, 1 egg yolk, 2 cups flour, 1/4 tsp salt).

I pressed the dough into a 13x9 pan. Next time I might take more care to press evenly. There ended up being some distinctly thicker pieces. But then again, I might not. It really didn't matter all that much.

I baked it for 25 minutes at 350 degrees and then sprinkled (my favorite) Tollhouse semi-sweet chocolate chips all over. After just a few minutes, spread the chocolate evenly.

Crunch up a few candy canes in a ziplock bag while the cookie is baking and then after the chocolate is spread, sprinkle the pieces all over the top.

Then melt some white chocolate chips and drizzle it all over the top.

Put the pan in the fridge so that all the melty chocolate will harden and then take it out and cut it up into bars.

These are really good. After one bar on that first night, I was done. Later in the week I started eating two in one sitting. Before I knew it, they were gone.


Saturday, December 18, 2010

Gingerbread Extravaganza

Brett's gingerbread house got a little more intense this year. Not only was it a house with two gables, which required a lot more engineering and calculation, but he also decided to add a second, rather large lighthouse... that actually lights up. Ambitious, yes. But when Brett puts his mind to something, there is no stopping him.

He stayed up late for two nights working on blueprints. He calculated angles and lengths using stuff he learned in trig back in high school. (If you look closely you'll see something involving cosine.) He figured out specific measurements for each piece.

Then he stayed up late for two nights rolling out the dough, meticulously measuring and cutting out each piece, and then baking them. He used Life Savers this year instead of Jolly Ranchers because Life Savers have the clear pineapple flavor. He used these for the lighthouse windows so that the light could shine out brightly. Unfortunately the sugar darkened a little bit and ended up being kind of a brownish yellow.

Then construction began. I tried to help, but my poor hands were way too shaky. I was quickly relieved of my duties.

Sometime in the middle of the night, while I was fast asleep, Brett piped fences for the house and lighthouse on a silpat.

The next night was for finishing touches. I applied the M&Ms to the roof, Brett did everything else... mostly while I was in bed fast asleep. He created a special compartment for the battery-powered tea light and made a removable roof so we could turn the light on and off. He also dyed a little icing green and piped some wreaths and bushes.

AND... it lights up!

I could not be more proud of his gingerbread house skills!

Sunday, December 12, 2010

Super Chocolate Fudge Bundt Cake

Brett doesn't like chocolate. And that's ok with me. There are plenty of delicious, chocolate-free desserts out there. At my new job (the one that has unfortunately made blogging a low priority in recent months) everyone loves chocolate A LOT. I have unofficially declared myself the office birthday cake baker and this past week I was all set to make an angelfood cake, when I got an email from my boss regarding the birthday girl's cake preferences: "Her passion is chocolate." Well, first of all, you don't ignore the boss's guidance, and second of all, when someone's passion is chocolate, you can't give them an angelfood cake. The only problem was that I didn't have a stand-by recipe for a really decadent chocolate cake. I did a quick search on Tasty Kitchen and found this recipe for Chocolate Fudge Bundt Cake. It just looked like the kind of cake a chocolate lover would go crazy for.

The batter was super easy and fast to mix up: chocolate cake mix, instant pudding powder, sour cream, eggs, vegetable oil, water, and chocolate chips. I got out my lovely chrysanthemum bundt pan and sprayed gobs and gobs of Pam for baking. As pretty as this pan is, there are soooo many nooks and crannies for cake to get stuck in. I poured the super thick batter into the pan, popped it in the oven, and went to sit down.

About halfway through the baking process, I got up to check on it and saw that it was rising, which usually is a good thing, but it was rising up over the sides of the pan. There was not much I could do at that point, so I let it continue baking. I referred to the recipe, and it says to use a 10 inch bundt pan. I didn't break out the ruler, but I could safely say that my bundt pan is smaller than 10 inches. Oops!

When I pulled it out of the oven, it had risen some more--up and over the center hole. After it cooled, it did sink back down a little bit, but the hole was still covered over.

I flipped it over without incident, and like the rusty blogger that I am, I forgot to take a picture of the finished product. (If you would like to see what the chrysanthemum shape looks like, look at my amaretto cake.)

And the birthday girl loved it, which is all that matters to me! It was a chocolate lover's dream!

Wednesday, May 26, 2010

Birthday Cake!

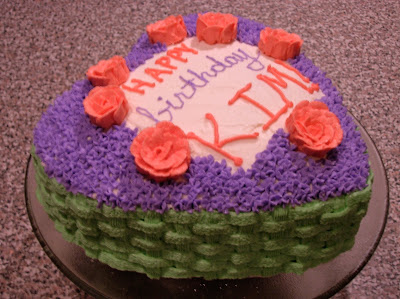
Amidst all of this May busy-ness I had a birthday! Brett woke up early and baked the cake so it would be nice and cool when we returned from our day out on the town. My least favorite part of cake decorating is trying to get the icing perfectly smooth so Brett did that part while I piped pink roses. Then I did my trademark basketweave around the sides of the cake and piped the words. It's a little weird writing "Happy Birthday" to yourself, but I'm a firm believer that the birthday cake should have a name on it.

For the finishing touches, Brett added tiny purple flowers made by a special tip that I just can't figure out how to use. He's just got the magic touch I guess.

And after a short stint in the freezer, I placed the roses all over.

The cake turned out beautifully and tasted great too!

Friday, April 2, 2010

Peanut Butter Criss- Cross Cookies

One time when we were at Brett's parents' house, Brett's mom passed out some cookies that did not have the fork criss-cross in them. They were tasty and obviously peanut butter cookies and so we all laughed when Brett's dad said something along the lines of, "These are good. What kind of cookie are they?"
"Peanut butter!" We replied.
"But they don't have the criss-cross!" We thought it was funny that the criss-cross is so closely associated with peanut butter cookies that if a cookie doesn't have it, it must not be peanut butter!

This is a super classic recipe that everyone can instantly recognize mainly because of that fork-pressed criss-cross. Brett practically lives off of peanut butter, so of course he loves these cookies.

Since we are on a big maple syrup kick, I decided to substitute 1/4 cup of sugar with 1/4 cup of maple syrup. I instantly regretted doing this because real maple syrup is not cheap, and the peanut butter totally (obviously) is the star of the show. The maple flavor was lost in this batter.

As I was making these cookies I was trying to talk to my mom at the same time and actually forgot to criss-cross one batch. Do they still look like peanut butter cookies to you?

No? Perhaps these then:

Peanut Butter Criss- Cross Cookies
1 cup peanut butter
1/2 cup butter
1/2 cup sugar
1/2 cup brown sugar
1 egg
1/2 tsp vanilla
1 and 1/2 cup flour
3/4 tsp baking soda
1/2 tsp baking powder
1/4 tsp salt

In a large bowl, cream together peanut butter, butter, and sugars until light and fluffy. Add egg and vanilla.

In a medium bowl, combine flour, baking soda, baking powder, and salt.

Add to creamed mixture.

Roll into 1 inch balls. Flatten with fork first one way and then cross the other way.

Bake at 375 degrees for 10-12 minutes.

Friday, February 12, 2010

Sour Cherry Coffee Cake

Foolin' Around in the Kitchen is officially two years old! Thanks to everyone who reads my little blog!

In celebration of my "blogiversary" and Valentine's Day, I made a Sour Cherry Coffee Cake from Martha Stewart's Baking Handbook. This recipe has several steps but turned out very tasty.

I mixed up the batter and poured half of it in the bottom of a greased angel food cake pan (or as Martha calls it- a tube pan.) Then I placed cherries on top of the batter so that none were touching the pan. The rest of the batter went on top of that.

Then I had to make the streusel topping which turned out to be a little more complicated than I anticipated. Martha only includes a recipe that will make 4 cups of streusel and I only wanted 1 cup, so I had to fourth everything. You all know how sometimes halving things can go badly in my kitchen, so I made sure to write everything down. I ended up with some eighths and sixteenths but all in all it went well.

I sprinkled the streusel on top (it seemed like way too much but I went with it) and then put it in the oven.

When it came out of the oven it was not done, so I let it go five more minutes and it still wasn't done, so I let it go four more minutes and it was good enough. I declared it done.

After cooling for 15 minutes I inverted it onto a cooling rack with a baking sheet underneath just as Martha prescribed. Martha's a smart lady. Probably half of the streusel came off when I plopped the cake upside down onto the cooling rack. Then I carefully turned it back over with my hands.
I couldn't let all that topping go to waste, so I tried to scoop it up and put it back on top.

When the cake was completely cool I mixed up some milk glaze (1 cup powdered sugar and 2 T milk) and drizzled it all over the cake.

The cake was very good! I was a little worried about those cherries being too tart, but the cake is so sweet that it balances it out. The cherry bites are my favorite.

Wednesday, February 3, 2010

Creme Caramel

A while back I received a cute little cookbook called "Easy Desserts". Upon glancing through, I noticed that there were a lot of recipes that called for vanilla bean, so I promptly added vanilla beans to my Christmas list. Like saffron, that falls into the category of, "It would be nice to have, but I'm not going to buy it." Brett's mom (again) indulged my eccentric wish list.

With a tube of vanilla beans in my hand, I went through the cookbook again and found a beautiful picture of creme caramel. I call it flan. Or at least that's what the picture looks like to me. Maybe they are completely different (which would explain a lot.) Brett and I love flan. We ordered it regularly at El Torito where, we believe, the best flan on Earth resides. (We have tried more "authentic" flans but have a special place in our hearts for El Torito's version.) Unfortunately the nearest El Torito is 3,000 miles away now, so we attempted to make our own.

I split the vanilla bean and scraped out the seeds and put everything into a saucepan of milk over medium heat.

I cracked five eggs and put Brett in charge of the caramel sauce.

Here is where I have a problem with "Easy Desserts." I think they left important information out of the recipe to make it appear easier. There were very little instructions about heating the sugar, water, and salt. No temperature. No high/medium/low heat instructions. Simply a color: "deep caramel color". It says to take it off the heat when it reaches this color and wait until it stops sizzling. We quickly realized that if we waited till it stopped sizzling it was going to be totally burnt. So Brett just poured the sizzling REALLY deep caramel colored liquid into the custard cups. He also poured boiling water into the baking dish for a water bath.

I added some sugar and salt to the milk mixture and then gradually whisked it into the eggs.

Brett poured the custard into the custard cups and then we baked them.

Again there were some missing instructions. We weren't sure what to do after baking them. All the recipe said was "serve at room temperature." We opted to remove them from the water bath and let them cool on a cooling rack.

They smelled great so I ate mine before it came to room temperature. I cut around the edge and flopped it onto a plate. It was not centered at all.

Brett got his in the center, but it caved in somehow.

The tasting was jarring. The caramel sauce looked perfect, but was way too bitter. Overdone. Near burnt. I poured my sauce off into the sink and focused on the custard. Brett followed suit. The custard was a little eggy. And despite all of that precious vanilla, it was bland. It needed to be sweeter.

We looked at the six custard cups left and briefly discussed throwing them out. Instead I covered them with plastic wrap and put them in the fridge. They were not at all a satisfying dessert like we had hoped, but they were edible.

The next day, I was surprised to find that they were much better cold. Again, not really a satisfying dessert, but better.

I can say definitively that we will never make this dessert again.

When all the little custards were gone I indulged Brett's request and made some wonderfully sweet and satisfying chocolate chip cookies.